A 10 x 30 tent is a smart choice for event planning. It's a versatile workhorse, giving you 300 square feet of covered space.
This size hits the perfect middle ground—large enough for a good guest list but not so massive that it overtakes your venue.
What a 10 x 30 Tent Can Do For Your Event
Think of this tent as the foundation of your event. Before you can plan for tables, food, or a dance floor, you need to define the space. A 10 x 30 tent often fits the bill perfectly, working for everything from backyard weddings and milestone birthdays to corporate functions and product launches.
The real question isn't just about the space, but how you use it. The number of people you can comfortably host depends entirely on your layout. A standing cocktail party feels completely different from a formal sit-down dinner, and the capacity reflects that.
Understanding Guest Capacity
The first rule of tent planning is to avoid overcrowding. A packed tent feels stuffy and awkward, while one that's too empty can kill the party's energy. The goal is to find the sweet spot where guests are comfortable and the atmosphere is right.
How your 10 x 30 tent functions comes down to the setup you choose:
- Seated Dining (Long Tables): The most efficient option for seating guests for a meal.
- Seated Dining (Round Tables): A classic choice that encourages conversation but uses more floor space per guest.
- Cocktail or Standing Events: This layout provides the highest capacity, freeing up room for guests to move and socialize.
Knowing these numbers upfront is a game-changer. It allows you to book caterers and send invites with confidence, knowing everyone will have a great time.
To give you a clear picture, here is a simple chart. Use this cheat sheet to quickly estimate how many people will fit based on common event styles.
Quick Guide to 10 x 30 Tent Capacity
This table shows the estimated guest capacity for a 10 x 30 tent based on common event layouts. Use it as a starting point to determine if this tent size is the right fit for your gathering.
| Layout Style | Estimated Guest Capacity | Best For |
|---|---|---|
| Ceremony-Style Seating | 50-60 Guests | Weddings, presentations, or award ceremonies. |
| Cocktail/Standing Room | 40-50 Guests | Mixers, social hours, and casual parties. |
| Seated Dinner (Banquet) | 30-40 Guests | Formal dinners and efficient seating. |
| Seated Dinner (Round Tables) | 24-32 Guests | Weddings and events promoting conversation. |
These numbers are a reliable guide. Remember to also account for other elements you might want under the tent—like a buffet line, a small bar, or a gift table—as they will take up usable square footage.
Designing Your Space with Smart Tent Layouts
Once you've chosen a 10 x 30 tent, the next step is making the 300 square feet work for you. Think of it less like filling a space and more like directing a play. A good layout creates a fantastic guest experience, guiding people effortlessly from one moment to the next.
The goal is to create natural flow. Guests should be able to move, mingle, and grab a drink without navigating a maze. Every decision, from table shape to buffet placement, shapes the event's vibe.
Blueprinting Your 10 x 30 Tent Layout
The most common question is, "How many people can I really fit?" The answer always depends on the layout. Let's look at the three most popular blueprints.
- Banquet-Style Seating: This is your go-to for maximizing seated guests. Using long, rectangular 8-foot tables is incredibly efficient. You can comfortably seat around 30 to 40 people, making it perfect for a formal dinner or a family-style meal.
- Round Table Seating: For a more classic, elegant feel that encourages conversation, 5-foot round tables are the way to go. They take up more room, but the social atmosphere is worth it. This setup usually accommodates 24 to 32 guests.
- Cocktail Hour Setup: For a standing reception or a casual mixer, you can skip most of the seating. A few high-top tables give guests a place to rest drinks and plates. This opens up the floor for mingling and fits the most people, around 40 to 50 standing guests.

This gives you a quick visual on the raw numbers. That 300 square feet is your playground, and knowing that number is the first step in sketching out your plan.
Creating Flow and Function
A great layout anticipates your guests' needs. One of the biggest mistakes is creating bottlenecks, especially around food.
For instance, a buffet line along a long wall seems smart, but you need clearance. Allow at least 4 to 5 feet between the buffet's edge and the nearest dining chair. Anything less creates a traffic jam of people trying to squeeze by with full plates.
The secret to a successful tent layout is creating invisible pathways. Guide guests naturally from the entrance to the bar, seating, and food without them ever feeling lost or crowded.
Planning a wedding reception can be tricky. To visualize how a sweetheart table, guest seating, and gift area will fit together, using a dedicated wedding floor planner can be a lifesaver. It turns abstract ideas into a concrete, workable plan.
Integrating Special Zones
Even in a 10 x 30 space, you can carve out distinct zones for different activities with smart trade-offs.
Here are a few common scenarios:
- Dinner with a Small Dance Floor: You can absolutely have a dance floor. A small 8x8 foot floor at one end of the tent works perfectly. Just know it will likely cost you one round table, reducing seated capacity by about 8 guests.
- Reception with a DJ Booth and Bar: For a cocktail party, place the bar at one end and the DJ at the other. This pulls people through the entire space, with the central area and high-tops becoming a perfect zone for conversation.
- Buffet and Gift Table: In a dinner setup, place the buffet along one long wall and the gift or dessert table on the opposite short end. This separates the flow of traffic so guests aren't crossing paths for different purposes.
These same principles apply to any tent size. If you're working with a smaller footprint, check out our guide on setting up a 10 x 20 shade canopy. Making every square foot count is a universal challenge, and a good plan is always the key.
Choosing Your Tent Structure: Frame vs. Pole
After mapping out a rough floor plan, you'll face a major decision: the tent’s structure. This isn't just a style choice—picking between a frame tent and a pole tent defines where you can set up, how you use the interior space, and the event's overall vibe.
A frame tent is a modern, free-standing structure. A rigid aluminum or steel frame supports the vinyl top, meaning there are no center poles. You get a clean, open 300-square-foot rectangle to work with.

This self-supporting design makes frame tents incredibly versatile. You can set them up on grass, asphalt, a concrete patio, or a wooden deck. If you can’t drive stakes into the ground, a frame tent is the go-to solution, which is why they are common at street fairs, in parking lots, and for backyard parties on paved surfaces.
The Modern Flexibility of Frame Tents
The biggest advantage of a 10 x 30 frame tent is the completely open interior. With zero poles to plan around, your layout options are limitless. You can position tables, a buffet line, or a dance floor exactly where you want them, giving you total creative freedom.
That unobstructed space is a game-changer for intricate setups or when you need to maximize every inch. The rigid frame also makes it easier to hang lights, decor, and small fans.
There are a couple of trade-offs. Frame tents are heavier with more parts, making setup more involved—many people opt for professional installation. And while their functional, boxy profile is clean and modern, it lacks the soaring, classic peaks some prefer for weddings.
A frame tent is all about function and flexibility. If your event is on a hard surface or your layout can't accommodate center poles, the frame tent isn't just the best option—it's often the only one.
The Classic Elegance of Pole Tents
A pole tent offers a timeless, elegant look. These are the tents of classic garden weddings, with graceful, sloping rooflines and dramatic high peaks. Their structure relies on one or more center poles pushing the canopy up from the inside, with tension from ropes and stakes holding everything taut.
This tension-based design creates the signature swooping peaks, giving the inside a grand, airy atmosphere that feels more celebratory and photogenic.
But that beautiful design comes with a hard rule: a pole tent must be set up on a soft, stakeable surface. It needs ground like grass or soil where stakes can be driven deep to provide the necessary tension and security. This makes them a non-starter for driveways, patios, or parking lots.
You also have to design your floor plan around the interior poles. For a 10 x 30 pole tent, you'll need to account for these support columns when placing tables, chairs, or a buffet, ensuring they don't block traffic flow or sightlines.
A Head-to-Head Comparison
Which one is right for your event? Sometimes the venue decides for you. If not, this breakdown should help you choose.
| Feature | 10 x 30 Frame Tent | 10 x 30 Pole Tent |
|---|---|---|
| Interior Space | Completely open; 100% usable floor space with no obstructions. | Has center poles that must be incorporated into the layout. |
| Surface Requirement | Can be set up on grass, asphalt, concrete, or decks. | Requires a stakeable surface like grass or soil. |
| Aesthetic | Modern, functional, with a squared-off roofline. | Classic and elegant, with high, sweeping peaks. |
| Setup Complexity | Generally more complex and heavier; often needs professional setup. | Simpler design but requires precise staking for tension. |
| Best For | Events on hard surfaces, complex layouts, corporate functions. | Weddings, garden parties, and events on grass with a traditional feel. |
Ultimately, it’s a simple decision tree. If you're setting up on asphalt or concrete, you need a frame tent. If you're on grass, you can choose between the practical, open space of a frame tent and the classic, picturesque style of a pole tent.
Turning a Tent into a Complete Venue
Your 10 x 30 tent is the canvas, but the right accessories are the paint. They transform a basic shelter into a memorable venue. It’s the details—from the flooring to the lighting—that create comfort, set the mood, and make an event feel special.

Think of it this way: you wouldn't move into a house with just walls and a roof. You need flooring, windows, and climate control. The same principle applies here. These accessories aren't optional extras; they're fundamental to a great event.
Building Your Venue from the Ground Up
Let's start with the surface your guests will walk on. Flooring instantly elevates a tent from a simple canopy to a legitimate event space. An uneven, grassy, or muddy patch of ground isn't just uncomfortable—it's a potential trip hazard.
You have solid flooring choices for a 10 x 30 tent:
- Simple Ground Covers: Basic tarps are the most budget-friendly option. They won't win style awards, but they keep ground moisture from seeping in. They are best for very casual get-togethers.
- Interlocking Floor Panels: A big step up. These hard plastic tiles snap together to create a firm, level surface that keeps shoes clean and provides a stable foundation for tables and chairs.
- Polished Dance Floors: If dancing is planned, a dedicated dance floor is a must. These wood or vinyl sections can be installed in a portion of the tent—like an 8x12 or 10x10 area—creating an inviting focal point for the celebration.
Next, consider the "walls." Sidewalls are game-changers. They provide critical protection from wind and rain, help control the temperature, and give the space an intimacy that an open-sided tent can't match.
By adding sidewalls and flooring, you transition from having a 'cover' to creating a 'room.' This simple change drastically improves guest comfort and gives you more control over the event environment.
Controlling the Climate and Ambiance
With the floor and walls in place, it’s time to manage the atmosphere. Keeping guests comfortable is non-negotiable, regardless of the weather. For chilly evenings, portable propane heaters are a fantastic solution. A single unit can often warm a 300-square-foot space, but always follow safety guidelines for proper ventilation.
For warmer days, air circulation is key. Strategically placed pedestal fans can create a gentle breeze that prevents the air from becoming hot and stagnant. These simple additions make a world of difference.
Lighting is just as important for setting the right mood. Get creative:
- Bistro or String Lights: Draped along the tent's frame, these cast a warm, festive glow perfect for evening parties.
- Perimeter Lighting: Installed along the inside edges of the tent, these lights provide broad, even illumination.
- Uplighting: For a touch of drama, place lights on the floor and point them up the fabric sidewalls.
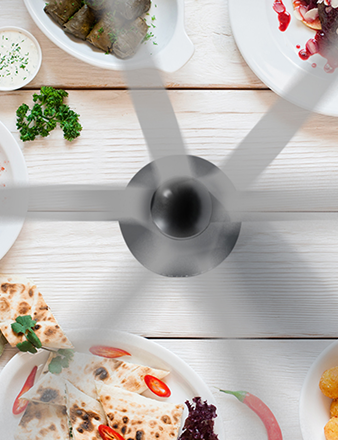
A Flawless Dining Experience
If you’re serving food, hygiene and comfort are top priorities. A small detail can make a massive difference. Nothing ruins a beautiful buffet spread faster than flies and other pests.
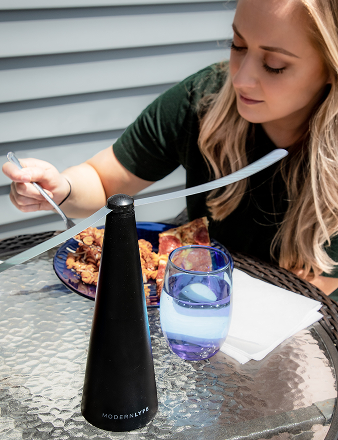
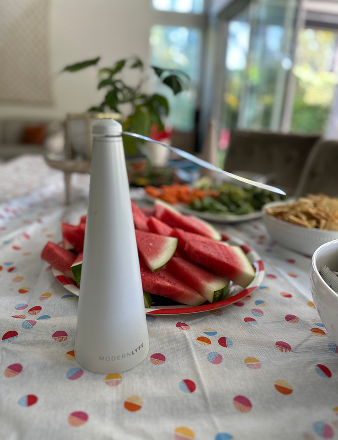
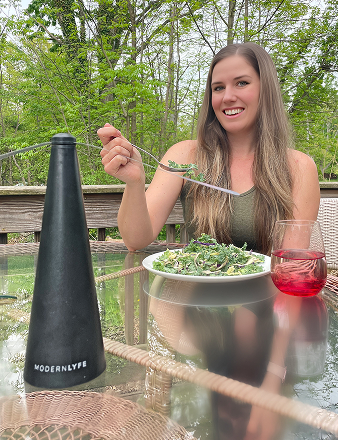
A brilliant and discreet solution is to use modern, battery-operated fly fans. They are quiet, visually unobtrusive, and far more pleasant than smelly candles or loud zappers. Their soft-spinning blades create an air current that deters flies from landing on food. They are perfect for:
- Buffet Lines: Place fans along the tables to protect the dishes.
- Dining Tables: A single fan in the center of each table keeps the immediate area pest-free.
- Bar Areas: Keep flies away from drinks, mixers, and garnishes.
It’s a small investment that protects your food and lets guests socialize without being bothered. If you host many outdoor events with food, a 10 x 10 screened canopy offers another excellent layer of protection.
The demand for these versatile shelters is clear. The global market for tents, including popular models like the 10 x 30 tent, was valued at USD 5.40 billion in 2023. That number is projected to hit USD 8.30 billion by 2030, showing how essential these structures have become for all types of events.
Your Tent Setup and Safety Checklist
A secure, properly installed 10 x 30 tent is the bedrock of a successful event. Think of this phase less like assembly and more like building a temporary venue. Getting it right ensures everyone and everything stays safe.
A smooth setup begins long before the tent arrives. It starts with a careful site inspection. Before you choose a location, use a measuring tape. You need more than just 300 square feet for the tent's footprint; you need a buffer of at least 5 to 10 feet around the entire perimeter for staking, raising the frame, and giving guests a clear path.
Pre-Setup Site Preparation
With your spot measured, the real work begins. The ground can hide a surprising number of hazards, and it's your job to find them before they cause a problem.
Skipping this step is risky and can lead to serious accidents or costly damage. A formal risk assessment for events is the professional way to spot these dangers ahead of time.
Here's what you must do before the tent goes up:
- Check for Overhead Obstructions: Look up for low-hanging tree limbs or, more importantly, power lines. The tent’s peak and installation equipment need plenty of clear vertical space.
- Identify Underground Utilities: This is critical. Before hammering a single stake, call your local utility location service (like 811 in the U.S.). They will mark underground water pipes, gas lines, and electrical cables, preventing a dangerous strike.
- Clear and Level the Ground: Walk the entire footprint and remove rocks, sticks, or other debris. A clean surface protects the tent’s vinyl from punctures and creates a more stable, comfortable floor for your guests.
A well-prepared site is a safe site. The few minutes you spend checking for overhead and underground hazards can prevent a major disaster, ensuring your event is memorable for the right reasons.
Anchoring Your Tent for Maximum Safety
Properly anchoring your 10 x 30 tent is the single most important part of the setup, especially if there's any chance of wind. The method depends on your tent type and the surface.
Pole tents get their stability from tension, so stakes are mandatory. Drive heavy-duty steel stakes deep into the ground at a 45-degree angle, pointing away from the tent. This provides maximum holding power. Always follow the manufacturer’s guidelines on the number and placement of stakes.
Frame tents offer more flexibility. While staking is the best method on grass, that's not always an option. When setting up on hard surfaces like asphalt or concrete, you must use heavy weights.
Common Anchoring Options for Frame Tents:
- Concrete Ballast Blocks: The professional standard. They provide immense weight, often 500 lbs or more per block, to secure each leg.
- Water Barrels: A popular and effective alternative. A standard 55-gallon barrel filled with water weighs over 450 pounds, providing a solid anchor.
A solid anchoring plan is as vital to your event as a well-organized kitchen is to catering. Speaking of which, our comprehensive catering equipment checklist can help with the food service side of things.
Common Questions About Using a 10 x 30 Tent
Even after mapping out the perfect layout, a few practical questions are bound to come up. Here are some of the most common questions about planning an event with a 10 x 30 tent.
Getting these details sorted out ahead of time is key to a smooth, successful gathering.
How Should I Prepare for Wind or Rain?
Weather is the biggest variable for any outdoor event, but a good 10 x 30 tent is built to handle it—if set up correctly. The strategy is three-part: professional installation, solid anchoring, and sidewalls.
Secure anchoring is non-negotiable. Whether using heavy-duty stakes or massive weights like water barrels, this is what keeps your tent stable in the wind. Adding sidewalls creates a protective shield against blowing rain and gusts, keeping guests, decorations, and food tables safe and dry.
A properly secured tent with sidewalls can handle a passing shower or moderate wind without drama. However, if the forecast looks severe, always follow the advice of your rental company—they know their equipment's limits.
Can I Set Up the Tent Myself?
The answer depends on the tent type. Some lighter-duty 10 x 30 frame tents are designed for DIY setup with snap-together poles, manageable for a few handy people. For a casual backyard party, this can be a great money-saving option if you follow the instructions perfectly.
However, for commercial-grade frame tents and all pole tents, leave it to the professionals. Pole tents are especially tricky, as they get stability from precise tensioning that requires experience to get right and, more importantly, to do safely.
Professional setup isn't just a luxury; it's a safety and liability issue. Installers are trained to anchor a tent for your specific ground conditions and local weather patterns, ensuring it's structurally sound for your entire event.
What Kind of Power Do I Need?
Figuring out power needs is one of the most overlooked yet critical steps. The last thing you want is a breaker tripping mid-event. Start by listing every single item that needs to be plugged in.
Some simple items are no problem:
- LED String Lights: A few strands use very little power and can usually run on a standard 15-amp household outlet.
- Small Sound System: A basic speaker for background music will likely be fine on a regular circuit.
The trouble starts with equipment that has heating elements or powerful motors. Items like catering warmers, coffee makers, DJ subwoofers, and portable heaters are incredibly power-hungry. Trying to run them from a single home circuit is a guaranteed way to blow a fuse.
For any event with more than just simple lights and a speaker, a dedicated generator is your safest bet. A rental expert can help you add up the wattage of all your equipment to ensure you have more than enough power for the entire night without interruption.
At MODERN LYFE, we believe the best events are made in the details. Keep your guests comfortable and your food service pristine with our elegant, quiet fly fans. Explore our solutions at https://modernlyfe.com and add that perfect final touch.