A great dessert table needs a strong centerpiece. For a large display, a 100 cupcake stand isn't just equipment—it's the anchor that turns simple treats into a stunning visual focal point for your event.
Building Your Perfect Dessert Display

This guide provides professional strategies for choosing, assembling, and styling a cupcake display that looks amazing and functions flawlessly. It’s about balancing show-stopping design with practical needs like stability and food safety.
The goal isn't just to serve dessert; it's to create an experience. The right stand elevates your event, whether it's a birthday party, wedding, or corporate function.
Beyond the Basics of Presentation
Think of your cupcake stand as a stage and the cupcakes as the performers. A well-chosen display guides your guests' eyes and sets the tone for your event.
A planned display feels intentional and inviting. For more ideas on creating a cohesive tablescape, read these tips on how to set a beautiful table. Integrating your cupcake stand into the overall table design creates a memorable look.
Key Elements for a Successful Display
A successful display comes down to a few key details. Here’s what you need to get right to create a display that functions perfectly from start to finish:
- Aesthetic Harmony: Your stand must match the event's theme. A rustic wooden tower fits a barn wedding, while a sleek acrylic stand suits a modern gala.
- Practical Stability: A wobbly stand is a major risk. Your display must be rock-solid, especially in high-traffic areas or outdoors.
- Food Safety and Hygiene: Protecting your cupcakes from dust, breezes, and pests is essential. A good display keeps treats fresh and appetizing.
- Guest Experience: The layout should allow guests to easily grab a cupcake without causing a traffic jam or toppling the setup.
The perfect dessert display is where form and function meet. It must be beautiful enough to draw people in and practical enough to withstand the event without a single issue.
This guide covers each of these elements. You can also find more strategies for an organized food layout in our guide on how to set up buffet tables.
How to Fit 100 Cupcakes on Your Stand
You have your 100 cupcake stand, but will one hundred cupcakes actually fit without looking crowded or leaving awkward gaps? Success depends on mastering the simple geometry of your display.
Think of your stand as dessert real estate. Every inch matters, and the goal is to arrange your cupcakes to look full and inviting.
A common mistake is trusting the advertised capacity without considering your specific cupcakes. A stand rated for 100 cupcakes might only fit 75 if they have generous frosting or wide toppers. A quick "dry run" with a few cupcakes can prevent major issues on event day.
Calculate Your Cupcake Footprint
Before arranging, you need the true "footprint" of one cupcake—including frosting. A standard cupcake has a 2.5-inch base, but buttercream swirls can push its total width to 3 inches or more.
That extra half-inch adds up quickly across one hundred cupcakes, making the display look crowded.
A half-inch of extra space per cupcake doesn't sound like much, but over 100 cupcakes, that's a lot of lost real estate. Measuring your actual finished cupcake size is the most critical first step.
Follow these steps:
- Measure the Base: Check the paper liner's diameter, typically 2 to 2.5 inches.
- Measure the Top: Measure the cupcake at its widest point, including frosting. This is your "clearance diameter" and the most important number for spacing.
- Check the Height: If your stand has tight spacing between tiers, measure the total height of a cupcake, including any toppers, to avoid crushing.
Choose an Effective Layout
Once you know your cupcake's true size, choose an arrangement. The layout affects both capacity and style. Your two main options are a grid or a staggered pattern.
A grid pattern, with cupcakes in neat rows, creates a clean, modern look. It’s simple and orderly but is the least efficient use of space. This layout is best for square or rectangular stands.
For a fuller, more abundant look, use a staggered pattern (also called an offset or honeycomb layout). By placing each cupcake in the gap between the two below it, you can fit about 15% more cupcakes into the same area. This is ideal for round or spiral stands as it creates a beautiful, cascading effect.
This table helps you visualize how much space you need.
Cupcake Stand Capacity Calculator
Use this as a quick reference. The "Recommended Layout" is based on maximizing space and aesthetics.
| Stand Tier Diameter/Size | Standard Cupcakes (2.5" base) | Mini Cupcakes (1.5" base) | Recommended Layout |
|---|---|---|---|
| 6" Round | 4-5 | 10-12 | Staggered |
| 10" Round | 9-10 | 24-26 | Staggered |
| 14" Round | 18-20 | 48-50 | Staggered |
| 18" Round | 28-30 | 80-85 | Staggered |
| 12" x 12" Square | 16 (4x4 grid) | 64 (8x8 grid) | Grid |
| 16" x 16" Square | 36 (6x6 grid) | 100 (10x10 grid) | Grid |
As you can see, a staggered layout on round tiers is more efficient for standard cupcakes, while a grid is perfect for filling a square stand.
Tier-by-Tier Capacity Planning
Most stands designed for 100 cupcakes are tiered, so you must plan each level separately. The smallest tiers at the top hold a few cupcakes, while the wide base holds the most.
For a standard 5-tier round stand, the capacity might break down like this:
- Top Tier (6" diameter): Holds about 4-5 cupcakes.
- Second Tier (10" diameter): Fits around 9-10 cupcakes.
- Third Tier (14" diameter): Can hold 18-20 cupcakes.
- Fourth Tier (18" diameter): Room for 28-30 cupcakes.
- Bottom Tier (22" diameter): Holds the bulk, with 35-40 cupcakes.
These are estimates. The final count depends on your layout and cupcake size. A pro tip is to load from the bottom tier up. This keeps the stand's center of gravity low and stable, preventing it from tipping as you build the display.
Choosing the Right Material and Style
You’ve done the math. Now it’s time to choose a 100 cupcake stand that brings your display to life. The right stand defines your dessert table's personality.
Think of the stand as the stage for your desserts. Are you aiming for rustic charm or sleek modernity? The material is your first and most important decision.
A Guide to Stand Materials
Each material has its own style and function. What works for a garden party might not suit a formal gala. Here are the most common options:
-
Acrylic: This is the ultimate chameleon. Clear acrylic creates a "floating" illusion that makes your cupcakes the star. It's lightweight and affordable, but it can scratch, so handle it with care.
-
Metal: For durability, choose metal. Wrought iron, polished silver, or steel stands are tough and stable. A powder-coated metal stand is a workhorse for caterers, while an ornate silver one adds timeless elegance to a wedding. They are heavier and pricier but are a great investment for frequent use.
-
Wood: Nothing creates a natural or bohemian feel like a wooden stand. Tiered log slices or polished bamboo towers add warmth and organic texture. This material is perfect for outdoor events and rustic themes. Remember that unsealed wood can absorb oils and needs careful cleaning.
-
Cardboard: Don't dismiss cardboard stands. For a single-use event, they are a practical choice. They are affordable, lightweight, and often come in fun colors, making them ideal for kids' parties. Their main drawback is a lack of sturdiness, so avoid using them outdoors where wind could be an issue.
High-quality display ware is a booming market. The global cake stand market, including cupcake stands, reached USD 880 million and is projected to hit USD 1,358.11 million by 2031. This growth is driven by demand for impressive visual displays in hospitality and events. You can explore more data on these market trends to understand the value of a premium look.
Matching Stand Structure to Your Event
After choosing a material, consider the stand's shape. The structure affects how guests interact with the display.
Your display decisions can be visualized as a pyramid, with the stand's shape as the foundation.

As you can see, the form of the 100 cupcake stand is the base you build upon.
Pro Tip: Always consider how guests will access the cupcakes. A tower accessible from all sides is perfect for a central table. A tiered stand that’s flat on one side is better for a table against a wall.
Tiers, Towers, and Pedestals
Tiered Towers: This is the classic cupcake stand design.
- Round and Square Tiers: These offer a clean, symmetrical look. Round towers create a soft, cascading effect, while square tiers provide a modern, architectural feel.
- Spiral Tiers: For more visual flair, a spiral or staggered design creates a sense of movement that draws the eye. They look fantastic but can make it tricky for guests to reach cupcakes at the back.
Pedestal Clusters: This approach creates a more dynamic look. Instead of one tower, use a collection of individual pedestal stands at different heights.
- Flexibility: This setup is incredibly versatile. Arrange the pedestals to fit any table, creating a sprawling, custom "dessertscape."
- Variety: This is the perfect way to separate different flavors. Place chocolate cupcakes on one stand and vanilla on another for easy labeling and guest access.
- Aesthetic: A cluster of pedestals feels more abundant and less formal than a single tower, creating a relaxed yet chic look.
The goal is to create harmony. A rustic wooden stand at a farm-to-table dinner feels right. A sleek acrylic tower makes a bold statement at a conference. When you match the stand's material and structure to your event's theme, you're creating an experience, not just serving dessert.
Mastering Stability and Transportation
You’ve prepared dozens of cupcakes. Now you need to get them displayed perfectly. After choosing your 100 cupcake stand, the next step is ensuring it stays upright and gets to the venue without damage.
A wobbly stand is a liability. It risks ruining hours of work and creating a mess. Worse, it’s a potential safety hazard.
Ensuring your stand is rock-solid is non-negotiable. If the foundation is shaky, the entire display is at risk.
A Simple Checklist for Stand Stability
Before loading any cupcakes, perform a quick structural check. A few simple tests can prevent an accident. It all comes down to the stand's center of gravity.
A stand's stability is only as good as its weakest link. For a tiered tower, that is almost always the connection points between levels and the width of the base.
Run through this quick checklist:
- A Wide Base is Best: The wider the base, the more stable the stand. A narrow base raises the center of gravity, making it easier to topple.
- Level Surface is a Must: Never set up on an uneven table or sloped ground. Use a small level tool to check the surface, especially outdoors.
- Check the Connections: If your stand assembles, ensure every rod is screwed in tightly and each tier sits flush. One loose screw can cause a disaster.
- The "Wobble Test": Once assembled, give the top of the stand a gentle push. If it sways or wobbles nervously, reinforce it or move it.
If you're still concerned, especially in a high-traffic area, add weight to the bottom tier. Hide small, heavy items (like clean rocks or weights) behind the first row of cupcakes to anchor the display.
Securing Your Stand in Any Environment
Every venue has its own challenges. An indoor ballroom is very different from a breezy garden wedding.
For Outdoor Events: Wind is your primary enemy. Place the dessert table against a wall or in a sheltered tent. Avoid setting up a tall, lightweight 100 cupcake stand in an open area without a windbreak. Also, secure the tablecloth—a gust of wind can pull the entire display down.
For High-Traffic Indoor Areas: Indoors, the main risk is people bumping the table. Position your display out of the main flow of foot traffic, such as in a corner or along a wall. This is a simple but effective defense, especially at events with children.
The table itself is just as important as the stand. For a large display, you need a solid foundation. Our guide on choosing a 10-foot folding table can help you find one that won't buckle under pressure.
Transporting Your Stand Safely
Getting the stand from your kitchen to the venue requires a plan. The first decision is whether to transport it assembled or in pieces.
Disassembled (Recommended): This is the safest method. Pack each tier and all hardware (rods, screws) separately. Use bubble wrap or soft cloths to protect delicate materials like acrylic or wood. It takes a few extra minutes to assemble on-site, but it ensures your stand arrives in perfect condition.
Assembled (Use with Extreme Caution): Transporting a fully built stand is risky and only works for smaller, sturdy, one-piece models. If you must, secure it in your vehicle so it cannot slide or tip. Place it on a non-slip mat in the trunk or on the car floor—never on a seat.
A flawless display comes down to smart planning. Taking a few extra minutes to check your setup and pack securely ensures your cupcakes remain picture-perfect.
Keeping Your Cupcake Display Fresh and Hygienic

You’ve baked, frosted, and arranged a stunning display. But that work is wasted if the treats aren't safe and delicious. Food hygiene is what separates a professional event from a disaster.
The last thing you want is for your cupcakes to fall victim to dust, pollen, or pests. This is a major concern for outdoor events. Here’s what it takes to keep every cupcake pristine.
Start with a Spotless Stand
Before any cupcakes are placed, the stand must be flawlessly clean. You're setting the stage for edible art, and a clean canvas is non-negotiable. Different materials require different cleaning methods.
- Acrylic: Use a soft microfiber cloth with warm, soapy water. Avoid abrasive sponges or ammonia-based cleaners, which can cause cloudiness or scratches.
- Metal: For powder-coated or stainless steel, warm, soapy water works well. For an ornate silver stand, polish it with a dedicated silver cleaner before a final sanitizing wipe.
- Wood: Unsealed wood is porous and can trap bacteria. Use a food-safe cleaning solution on a damp cloth. For sealed wood, mild soap and water is sufficient.
- Cardboard: Since these are single-use, assemble them with clean hands on a sanitized surface.
This level of care for presentation is driving industry growth. The cake stand market, including large-scale displays, hit USD 1.0 billion in 2024 and is projected to reach USD 1.5 billion by 2033. This surge is powered by an F&B boom where a gorgeous presentation can increase dessert sales by up to 30%. With outdoor weddings and events jumping 18% in the US post-pandemic, a 100 cupcake stand paired with smart fly protection isn't a luxury—it's essential for a positive guest experience.
Guarding Your Display Against the Elements
Once your stand is clean, the real challenge is protecting the cupcakes, especially outdoors. Nothing ruins an appetite faster than flies on the dessert table.
Clumsy solutions like sagging plastic wrap or ugly netting destroy the visual appeal you worked hard to create.
The real goal is to create an invisible shield for your food—something that protects it without hiding it. This is where modern thinking completely changes the game.
Instead of physically covering your cupcakes, protect the airspace around them. This strategy allows you to maintain an open, inviting display while keeping pests away.
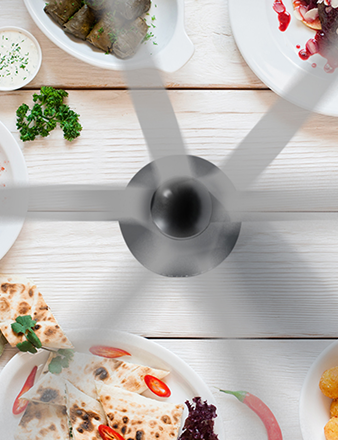
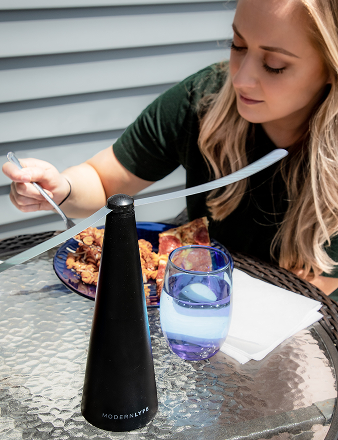
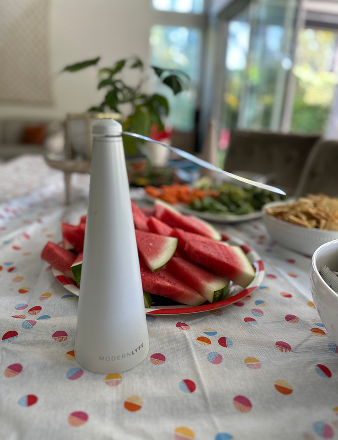
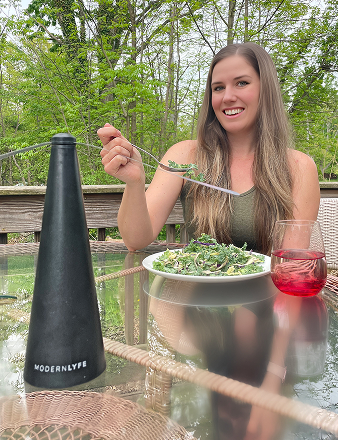
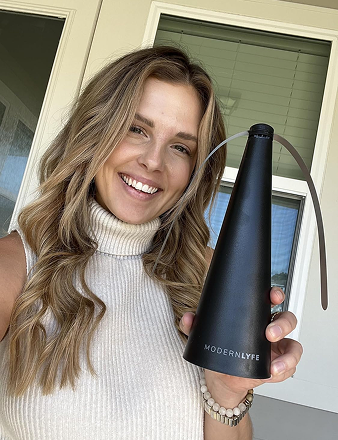
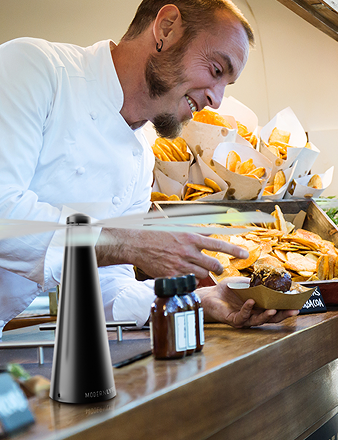
Modern Fly Protection That Actually Works
The most effective and elegant way to defend an open-air food display is with bladeless fly fans. These devices are both powerful and discreet, making them perfect for any event.
They work by creating a gentle, continuous breeze that prevents flies and other flying insects from landing. The soft, reflective patterns on the fan blades also disorient their vision, warning them away from your dessert station.
Here’s why they are a great fit for protecting your cupcakes:
- They Don’t Block the View: Unlike nets or domes, fly fans are unobtrusive. Guests can admire your entire cupcake tower without obstruction.
- They're Safe and Silent: The soft-touch blades stop on contact, making them safe around children and guests. They also run almost silently, avoiding distracting background noise.
- They Look Good: Modern fly fans have a sleek, minimal design that blends into your decor, adding practical sophistication instead of being an eyesore.
Placing a few of these fans around your cupcake stand establishes a protective perimeter. To learn more about creating a pest-free zone, read our complete guide on how to keep flies away from food. This modern approach ensures every cupcake stays fresh and appetizing.
Should You Buy or Rent Your Cupcake Stand?
Let's talk logistics. You need a display for 100 cupcakes, but should you buy or rent the stand? There's no single right answer; it depends on your needs. A professional caterer has different requirements than someone planning a one-time wedding.
Think of it as a cost-benefit analysis, weighing the upfront cost and storage against the convenience and flexibility of renting. Let's break it down to help you make a smart decision.
When Buying Makes Sense
Buying a cupcake stand is an investment. It’s the best choice if you plan to use it repeatedly. For bakers, caterers, or frequent hosts, owning a reliable stand means it’s always ready.
Buying is right for you if:
- You host events often: If you set up for parties or professional gigs several times a year, the cost-per-use drops quickly, making ownership a bargain.
- You have a signature style: Owning the stand lets you find one that perfectly matches your brand or home decor, avoiding rental shop limitations.
- You want a lasting asset: A well-made stand will be part of your event toolkit for years, becoming a dependable piece of equipment.
The market for these stands was valued at USD 979.57 million in 2024. With online stores now accounting for 35% of all sales, it’s easier than ever to find what you need. You can see more on the growth of the cake stand market and their accessibility.
When Renting Is the Smarter Move
For a single, major event like a wedding or large party, renting is often the hero. It gives you access to a high-end, professional-grade stand for a fraction of the purchase price.
Renting is your best bet when:
- It’s a one-off event: If you just need a stand for one day, renting is almost always more economical.
- You're short on storage space: A stand for 100 cupcakes is bulky. Renting means you don't have to find a permanent home for it.
- You want to match a specific theme: Renting allows you to choose the perfect style for any theme without cluttering your home.
The core question is: Will the stand pay for itself over time? If the answer is no, renting is the logical choice.
Ultimately, it's a balance of cost, convenience, and commitment. By thinking honestly about your usage, you can pick the option that saves you the most money, time, and hassle.
Your Top Questions, Answered
Here are quick answers to the most common questions about setting up a 100 cupcake stand, based on real-world event experience.
How Far in Advance Should I Set Up My Cupcake Stand?
Assemble the stand on-site on the day of the event. This keeps it clean and avoids moving a fully loaded, unstable tower later.
Wait to add the cupcakes until about 1-2 hours before guests arrive to ensure they look and taste fresh.
Can I Use a 100 Cupcake Stand for Other Desserts?
Yes, absolutely. A tiered stand is a versatile stage for macarons, mini pastries, chocolate-covered strawberries, or even small savory bites and party favors.
Just ensure the items fit the tier size and are stable on their own.
Your stand is a blank canvas. Don't be afraid to mix and match! A dynamic display with a variety of treats looks incredible and gives your guests more to enjoy.
What Is the Best Way to Clean an Acrylic Stand?
To keep acrylic crystal-clear, be gentle. Use a soft microfiber cloth, warm water, and a bit of mild dish soap.
Never use paper towels, abrasive sponges, or glass cleaners like Windex. These products will cause tiny scratches and leave the surface looking foggy. Wipe it down gently and dry with a separate clean cloth to avoid water spots.
How Do I Keep My Stand from Tipping Over Outdoors?
For outdoor setups, use a stand with a wide, heavy base for a lower center of gravity.
Find the most level ground possible. Often, a wobbly table is the real problem, not the stand. If you're still concerned, discreetly add small, clean weights to the bottom tier for extra stability.
After all that work, the last thing you want is for your beautiful display to attract unwanted guests. Keep it pristine and fly-free with an elegant solution from Modern Lyfe. Our bladeless fly fans protect your food without ruining the view.